


Understanding the Devils' Breakout Scheme
With a new coach comes new systems, so let's break down the Devils' defensive-zone breakout strategy and the pros and cons that come with it.

Over the next few weeks, I’d like to take the time to break down the Devils’ systemic play this season and evaluate how it affects different parts of their game. One drastic difference between this season and the previous three is their method of attack on breakouts and board battles, so that’s where I would like to start.
Without further ado, let’s break down the breakouts:
What Strategy Do the Devils Currently Employ?
Previous head coach Lindy Ruff’s defensive breakout strategy was simple: get possession of the puck and immediately look for a rush opportunity. Forwards would streak up-ice in the midst of board battles in hopes that they would be able to generate odd-man opportunities ad nauseam. In concept, this system works well to generate other-worldly offensive numbers — the Devils proved to be by far the most explosive rush team in the league in 2022-23, a season in which they stayed healthy and broke the franchise record for points in a season.
Last season, the Devils may have appeared, on paper, to be a shell of their former selves, but in reality still maintained their status as a top-five team in generating chances off the rush (according to AllThreeZones). Their season was sunk by goaltending and injuries, so it’s admittedly hard to gauge the reality of their play under ex-head coach Lindy Ruff.
This season, under new head coach Sheldon Keefe, the Devils really couldn’t be much more different from a defensive zone breakout perspective. Keefe employs one of the more conservative breakout systems in the NHL, relying more on maintaining possession than generating high-danger rush opportunities.
According to hockey tactician and ex-Maple Leafs analyst and consultant Jack Han, Keefe’s system is called “fight the panic,” and rightfully so.
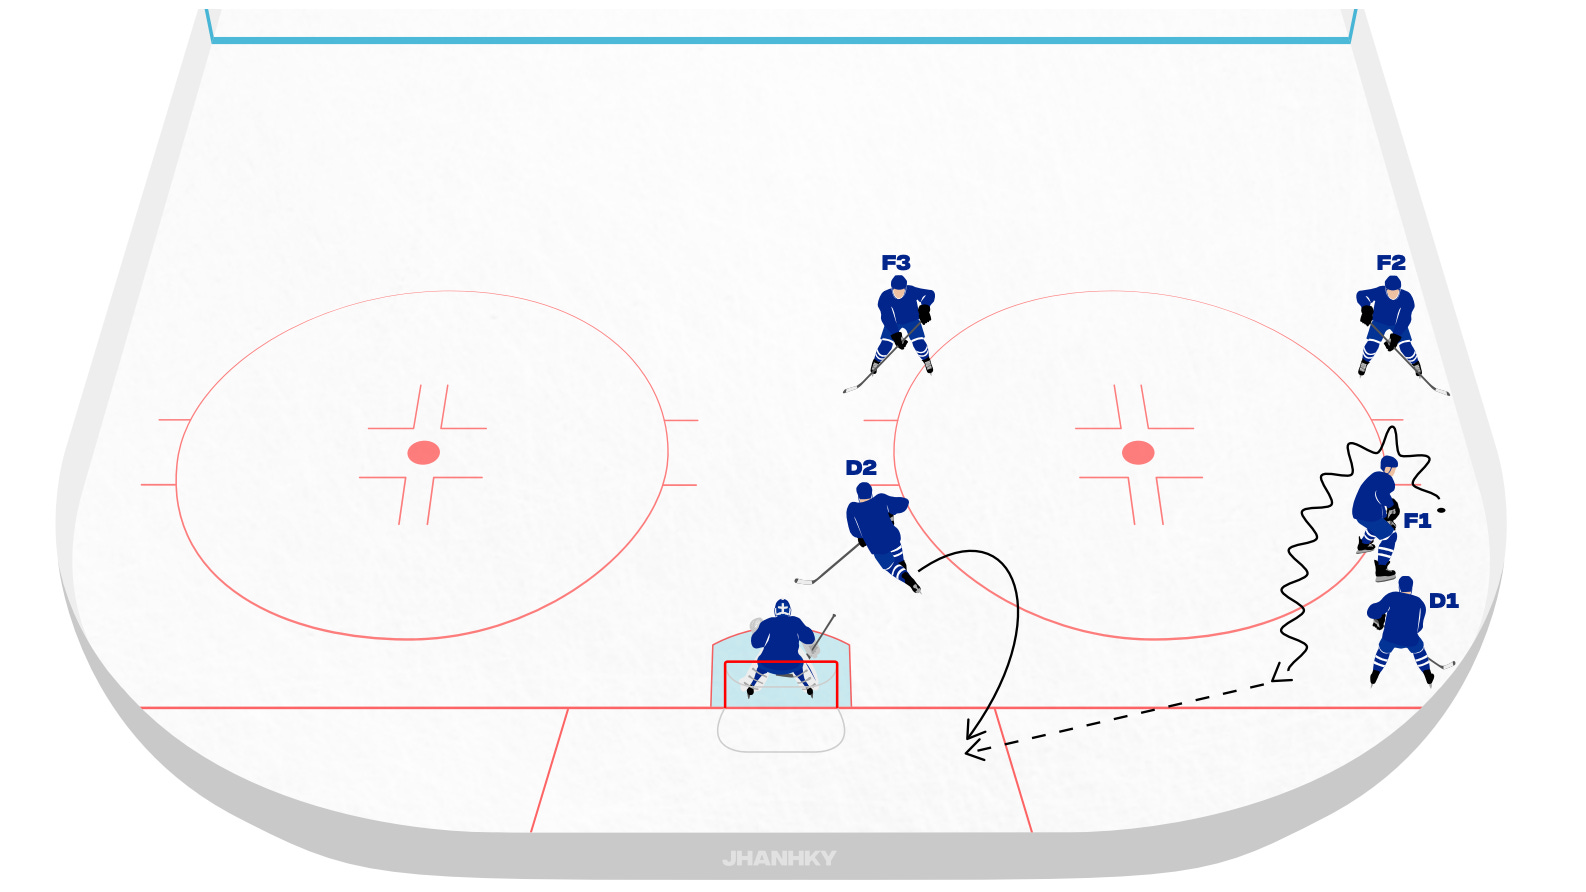
The system works as follows: F1 and D1 engage in a board battle, with D2 maintaining a presence in front of the net to protect that area of the ice. D2 will skate to the backside of the net or the opposite corner of the defensive zone if either F1 or D1 gets possession of the puck, depending on the situation and where the board battle is taking place.
If F1 gets possession of the puck, they more often than not peel back to send the puck to D2 unless there is a clear breakout opportunity with possession. The same goes for D1, who will opt for a stretch pass if there is a wide-open chance but otherwise pass the puck to his partner.
Once either F1 or D1 wins the board battle, F2 and F3 start their breakout and pose as stretch-pass threats on either side of the ice.
Once either D1 or D2 gets possession of the puck, F1 moves horizontally around the blue line (either from left to right or right to left, depending on where the board battle is taking place). This creates a shorter breakout pass opportunity for the defenseman with the puck, leading to generally safe zone exits. From there, F1 moves to the offensive zone either with possession or through a pass to F2 or F3.
As with any system, situational plays call for situational audibles. Sometimes, on the board battle, it will be D1 and D2 instead of D1 and F1, with F1 instead in the role that D2 would ordinarily be in (as a short-distance pass option). Sometimes, three players engage in a battle, in which case F2 or F3 rotate into the defensive zone as the outlet for a breakout.
More than anything, it’s a philosophy. “Fight the panic” doesn’t necessarily only apply when actively in a board battle. The entire idea is that the breakout should be safe. Oftentimes, you’ll see players peel back to avoid traffic or opt for surefire passes within the defensive zone when there are opponents in the zone as well. The entire breakout scheme is built on the pillar of safety.
Now that we’ve established the type of breakout the Devils use, let’s get into the benefits and drawbacks:
Benefits
Fewer DZ Turnovers
I’m going to start this off by saying that I don’t have the data to back this up — that’s possessed by private models which I don’t have access to — but in theory, this strategy results in fewer defensive zone turnovers. This happens for a couple of reasons:
Conservative breakouts from non-puck-moving defensemen — if a defenseman struggles with stretch passes, they simply don’t need to make one in this system. The F1 poses as a short-distance breakout target, and, if even that is too scary for a defenseman, they can always pass it back to their defense partner who will be in close proximity.
Working backward — rather than moving the puck into a presumably dangerous area after gaining possession, the Devils opt to move laterally and backward. If F1 were to gain possession, chances are he peels back to safe ice rather than pushing it up-ice into bodies. Rather than immediately looking for a stretch-pass, chances are that D1 will use a more conservative approach and send it to his partner. These both contribute to a generally lower rate of defensive turnovers, especially in comparison to Ruff’s high-octane system.
More Moldable to Defensive Defensemen
One issue that Ruff’s system in particular brought to the Devils — particularly in 2023-24 — was that it relied on defensemen being able to move the puck up-ice. When the defense corps is lacking in that department, it’s more of a struggle to get the puck out of the defensive zone. Losing Dougie Hamilton for 62 games of the season with a pectoral injury was a massive blow to the team in that more defensively-oriented defensemen were required to push the puck up-ice, which they were generally ineffective at doing. Luke Hughes was a strong puck-mover and Simon Nemec proved to be solid in that role, but the other defensemen — Jonas Siegenthaler, Brendan Smith, John Marino, Kevin Bahl, and Colin Miller — generally struggled with this adaptation.
In Keefe’s system, though, because it’s less reliant on stretch passes, the defensive defensemen are having an easier time breaking out. This means that the Siegenthalers, Brenden Dillons, and Johnathan Kovacevics of the world are going to inherently have an easier time keeping the puck out of the defensive zone. Instead of having to immediately look to stretch a retrieval into an odd-man opportunity the other way, the more methodical approach lets them take their time and play more conservatively. That’s why Siegenthaler and Kovacevic have been so effective defensively.
Adaptability vs. Different Forechecking Systems
Because Keefe’s system operates on short-distance passing for the most part, the Devils’ defense is more able to adjust to the different forechecking systems that other teams employ. Ruff’s run-and-gun breakout scheme struggled against aggressive forechecking systems, particularly versus the 2-1-2 (two forecheckers down low to pressure the puck below the goal line, one forechecker with a presence in the middle of the defensive zone, and the two defensemen floating around the blue line/neutral zone). Too often, this resulted in panic turnovers or giveaways on stretch passes.
With the ability to make not one, but two short-distance passes, all forechecking styles have to respect the breakout scheme and its ability to keep possession of the puck.
Drawback
Reduced Offensive Threat from the Rush
There’s really only one true drawback from my perspective, but it’s a gigantic one. Rush opportunities are inherently more effective than cyclic, forechecking opportunities at producing high-danger chances and goals.
They’re more dangerous for a couple of reasons:
Passing options — in odd-man situations, the biggest threat is a cross-ice pass. Getting the goalie to move side-to-side opens up shooting lanes all over the net, and nothing quite generates lateral movement for goalies like a rush chance. If there is a successful cross-ice pass, the goalie will be forced to make a spectacular play if they want to save the puck. Beyond that, the threat of a cross-ice pass makes a shot more dangerous without the pass. Defenders will often opt to take away passing lanes in odd-man situations, giving the shooter more time and space to think about (and execute) their shot with pinpoint accuracy.
Shot locations — rush chances (generally speaking) are taken from more dangerous areas of the ice, typically from between the dots and close to the net. The area gives the shooter more open-net space to shoot at and the proximity to the net gives the goaltender less time to react to the puck.
Because Keefe’s breakout strategy is so much slower and more methodical, there is a drastic difference between rush opportunities now versus under Ruff’s rush-centric system. In 2022-23, the Devils generated a mind-boggling 19.7 rush chances per 60 minutes, first in the league. In 2023-24, they generated 14.7, good for fifth in the NHL. This season, they’re generating just 12.9 rush chances per hour, which isn’t even top-ten. Of course, some of this can be attributed to a generally slower lineup, but the bulk of the blame is to put on the system.
As a result, their expected goal production has worsened. The Devils are generating 2.89 expected goals for per 60 minutes (xGF/60) this season. Last season, they generated 3.01, and in 2022-23, they generated 3.37. They were healthy in 2022-23, and the rush-oriented system generated nearly a half-xG more per hour at 5v5. Even in the injury-ridden 2023-24, they were able to generate more.
The results are similar for scoring chances for per hour (SCF/60) and high-danger chances for per hour (HDCF/60), too. In 2024-25, the Devils are generating 28.76 SCF/60 and 11.35 HDCF/60. In 2022-23, they generated 32.55 and 13.54, respectively. The results from 2023-24 are similar to this season, which is still jarring considering the personnel and health. Imagine how many more goals the Devils would be able to score if they were generating two more high-danger chances per game. I’m sure it would have resulted in some switched outcomes, too.
It gets to the point too that the Devils break out so infrequently with stretch passes that opposing teams simply… let their forecheckers sit in the zone. They’re unafraid of fast breaks completely. The easy counteraction to this is just to occasionally use that risky play.
Breaking Things Down
With the system highlighted in-depth, let’s take a look at some game situations and break it down so you can see the scheme in action, in order from least to most complicated:

This still frame is the quintessential example of the retrieval system at work. D1 (Dillon) and F1 (Dowling) are fending off an Edmonton forechecker. D2 (Hamilton) notices that Dillon has possession of the puck and rotates to behind the net for an easy pass option.

Again, another stereotypical photo example of this scheme at play, but this is before possession of the puck is determined. Engaged along the side wall in a board battle is a Senator and the Devils’ D1 (Pesce). A second Senator looks ready to engage, as does the Devils’ F1 (Dowling). To protect from high-danger chances, D2 (L. Hughes) sits by the netfront. If Pesce or Dowling come away from the puck in that board battle, he would presumably peel back behind the net.
I chose this clip to display the general philosophy of “fighting the panic” at work. There are three separate occasions in a ten-second span in which a Devils player opts for a safer, surefire breakout rather than a riskier play with potentially more upside, something that would have been different under Ruff. Starting off, F1 (Bratt) has the option of pushing the puck up-ice for the relatively nearby D1 (L. Hughes) but instead peels back with the puck and passes it to F2 (J. Hughes) at a short distance and without any risk.
From there, J. Hughes sees Bratt begin to streak while peeling back himself but opts to pass it back to D2 (Pesce) instead, showing more restraint than you would have seen last season. Pesce has three options here: 1) pass the puck up-ice to a streaking Bratt who is covered loosely, 2) perform a higher-risk short-distance breakout pass to J. Hughes with a Hurricane forechecker right there, or 3) give the puck back to L. Hughes in completely open, uninterruptable ice. Pesce chooses option 3.
This last clip is objectively the most complicated of the four examples, so I’m going to try my best to explain it in a palatable way.
Firstly, let’s talk about the positions of the players. Because of their positioning when entering into this board battle, D1 (Dillon) and D2 (Hamilton) occupy the would-be spots of D1 and F1 in the archetypal example. Instead of D2 being the safe pass option in the case of a gained puck possession, it’s F1 (J. Hughes), who rotates back behind the goal line once he realizes that the Devils are likely to come up with the puck.
Once J. Hughes gets the puck, you can see the “fight the panic” philosophy in action. F2 (Palat) rotates to behind the goal line, into open ice for a clear passing option while D2 moves into the high-danger area to stymy that opportunity if it arises for the Flyers. J. Hughes does not see Palat — or perhaps ignores him altogether — and instead pushes the puck back to Dillon. This forces Dillon and Hamilton to re-enter the board battle, which they lose, forcing J. Hughes to re-engage behind the net and allowing the Flyers to come up with a scoring chance. All the while, F3 (Bratt) never strays too far from the play, which would have been unheard of in Ruff’s system.
I hope this was a helpful glimpse into the ever-complicated world of coaching systems. Of course, this isn’t a cookie-cutter thing — systems are extremely fluid and hockey players adapt to plays every millisecond. Judgment calls on what to do by X player often dictate how successful these systems are, and coaches often modify their systems depending on who is on the ice. I implore you, though, to watch closely as the slower philosophy behind the Devils’ breakouts impacts their rush play. Sure, the play is “safer,” but it often results in fewer odd-man opportunities per game.